Wednesday, February 21, 2018

Snowflakes in Split Ring Tatting by Karen Bovard

Snowflake #14


Here is a picture of this snowflake from the back cover of the book.
The first ring is the very center of the snowflake.
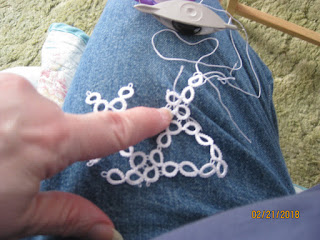
This is the interesting part of this pattern.  Ring number one is under my finger, ring number 2 is still open.  Ring number 3 was created by reversing my work and just tatting a regular ring with shuttle B. Then you go back to ring #2 and finish it.  This is so cool.
I have just completed ring #3 and am finishing the split ring #2.
All 3 rings completed.  This is so much fun.

Completed the second spoke of the 6.

All 6 spokes are completed.  Next is working on the points.
I was working on this point the day before and stopped in the middle of the 2 ring process, well, things did not go well trying to figure out how to do it.  That's probably why I quit in the first place.
It took me 3 tries to do the ring I am pointing at.  The ring off the connecting split ring has to be done with shuttle B on the back side of the split ring.  You can't close your ring if you try and do it with Shuttle A.
I finally gave up after messing another ring up and have to cut it off and try again twice.  Now I have threads to hide.  (I hate doing that after I'm finished)
Finished point number 2 on snowflake #14.  This one is going to be larger then the last one.

Tuesday, February 20, 2018

Snowflakes in Split Ring Tatting by Karen Bovard


This book has 54 different snowflakes all made with rings and split rings.  Because it is diagramed I can't show you the inside without violating copy right laws.
First 2 rings, I haven't done split ring tatting for a while, but it all came back to me.
I messed up and made this ring with attaching it to the second ring.  Tried to open the ring, but was too tired and finally cut it off and hid the ends in the split ring.  So that ring I'm pointing to is fuzzy.
Two points completed on the second round.  The diagram is easier to follow if you mark the rings you have completed.  I made a copy and enlarged it, since I don't see very well anymore.
I started this project about 2:00 pm Sunday and got this far by 8:30 pm.  I did take several breaks, but didn't really keep track of my time.
Took me a couple hours to finish and had to fill my shuttle mid point.  It measures 4.5 inches.


Friday, September 4, 2015

Lindsay Rogers


Rose and Thistle Mat


I have started to make this mat in Lizbeth bright yellow size 20.


The pattern first published in "Tatting for Special Occasions Mats" now it is reprinted in "Mastering Tatting"


I only made it so far before making the first mistake. (Grrrr)

This is Lizbeth size 20 in Bright Yellow.  It took me 2 hours and 31 minutes to complete.  It is pucking in the center.  Hopefully the will resolve when I press it.

The next step is to complete 7 roses.  I just finished one row of the first row before going to bed. I am using the Bright yellow for the center and Raspberry Frappe for the outside chains.
Here is what the finished rose looks like.  The pattern calls for 7 of them. It took an hour and 10 minutes to complete the first one.


Finished the 7 roses and now to Row 2 and joining the roses to the center.


I started row 2 using Lizbeth size 20 in Leaf Green DK.  Sorry for the quality of the second picture.  Should have used a tripod for the closeup.  This row seems off to me.  The written instructions were kind of confusing so I used the picture diagram mostly.


I am working on attaching rose #5.  I messed on the leaves when I was attaching #4 so ended up taking that part off and starting again.  I think I finally have the idea of row 2 only 3 more roses to go.


Over half way on row 4, now that I have the hang of how the row should go, I'm making mistakes.
Finished row 4, now to correct 2 missed joins and hide my ends.

I've clipped the ends of the thistles.  The nice thing about lizbeth thread is it doesn't fray.  That is causing me a problem making the thistle heads fluffy.

 Untwisted the threads, but it still doesn't look fluffy.

Someone suggested using a needle or crochet hook.  Still not fluffy.  Next I will try an old tooth brush.


Well after brushing with an old tooth brush for a whole day (off and on).  The heads are still not very fluffy.  Now we know Lizbeth thread is very tightly twisted.  One lady suggested Cornet thread would fluff out more.  So if you attempt this mat and want a really fluffy thistle head Don't use Lizbeth thread.  I love the colors that are available, so I will continue to use Lizbeth thread.

Total Time without brushing is 27 hours 37 minutes.


Red Ribbon in the Clark County Fair.  Didn't get it block properly.  The center was uneven also.  

Sunday, June 8, 2014

Wednesday, February 19, 2014

#12 - "Heart Blossom"

Heart #12 is called "Heart Blossom"
The center starts with the center ring and climb out with a mock picot to make the outside rings.  I messed up the join again.
The next round is a diamond of daisy's all connected by split rings.  I am getting plenty of practice with split rings on these patterns.  This is the most advanced pattern in the book.
The left top consisted of split rings joined between two daisy at the top.
Repeated the process on the right side.
Another round of split rings at the bottom and daisy's at the top.  The center point was a half daisy where I had to use 3 shuttles.  This picture shows how I messed up.  Had to cut it off and try again.
Repeat the process on the right side.
Here is the picture of all 12 hearts.


#11 "Heartbreaker"

#11 is called "Heartbreaker"
The center looks so pretty all by itself.
The next round I am adding butterflies to the points.  The ring from the previous round is the head for each butterfly.
Butterfly round completed.
On this round I added an overlapping chain with rings connecting the butterfly wings.
Added a butterfly chain on the left side for the top of the heart.
Another Butterfly chain on the right side makes the other top.
Then a split ring chain frames the whole heart.